I have a new fun project for this school year – I am going to be assisting the librarian at my daughter’s elementary school with designs for the library bulletin board. This post describes our back-to-school ‘Minecraft’ bulletin board.
Our elementary school librarian suggested that the first bulletin board of the school year showcase the students’ summer reading. The challenge was to incorporate book 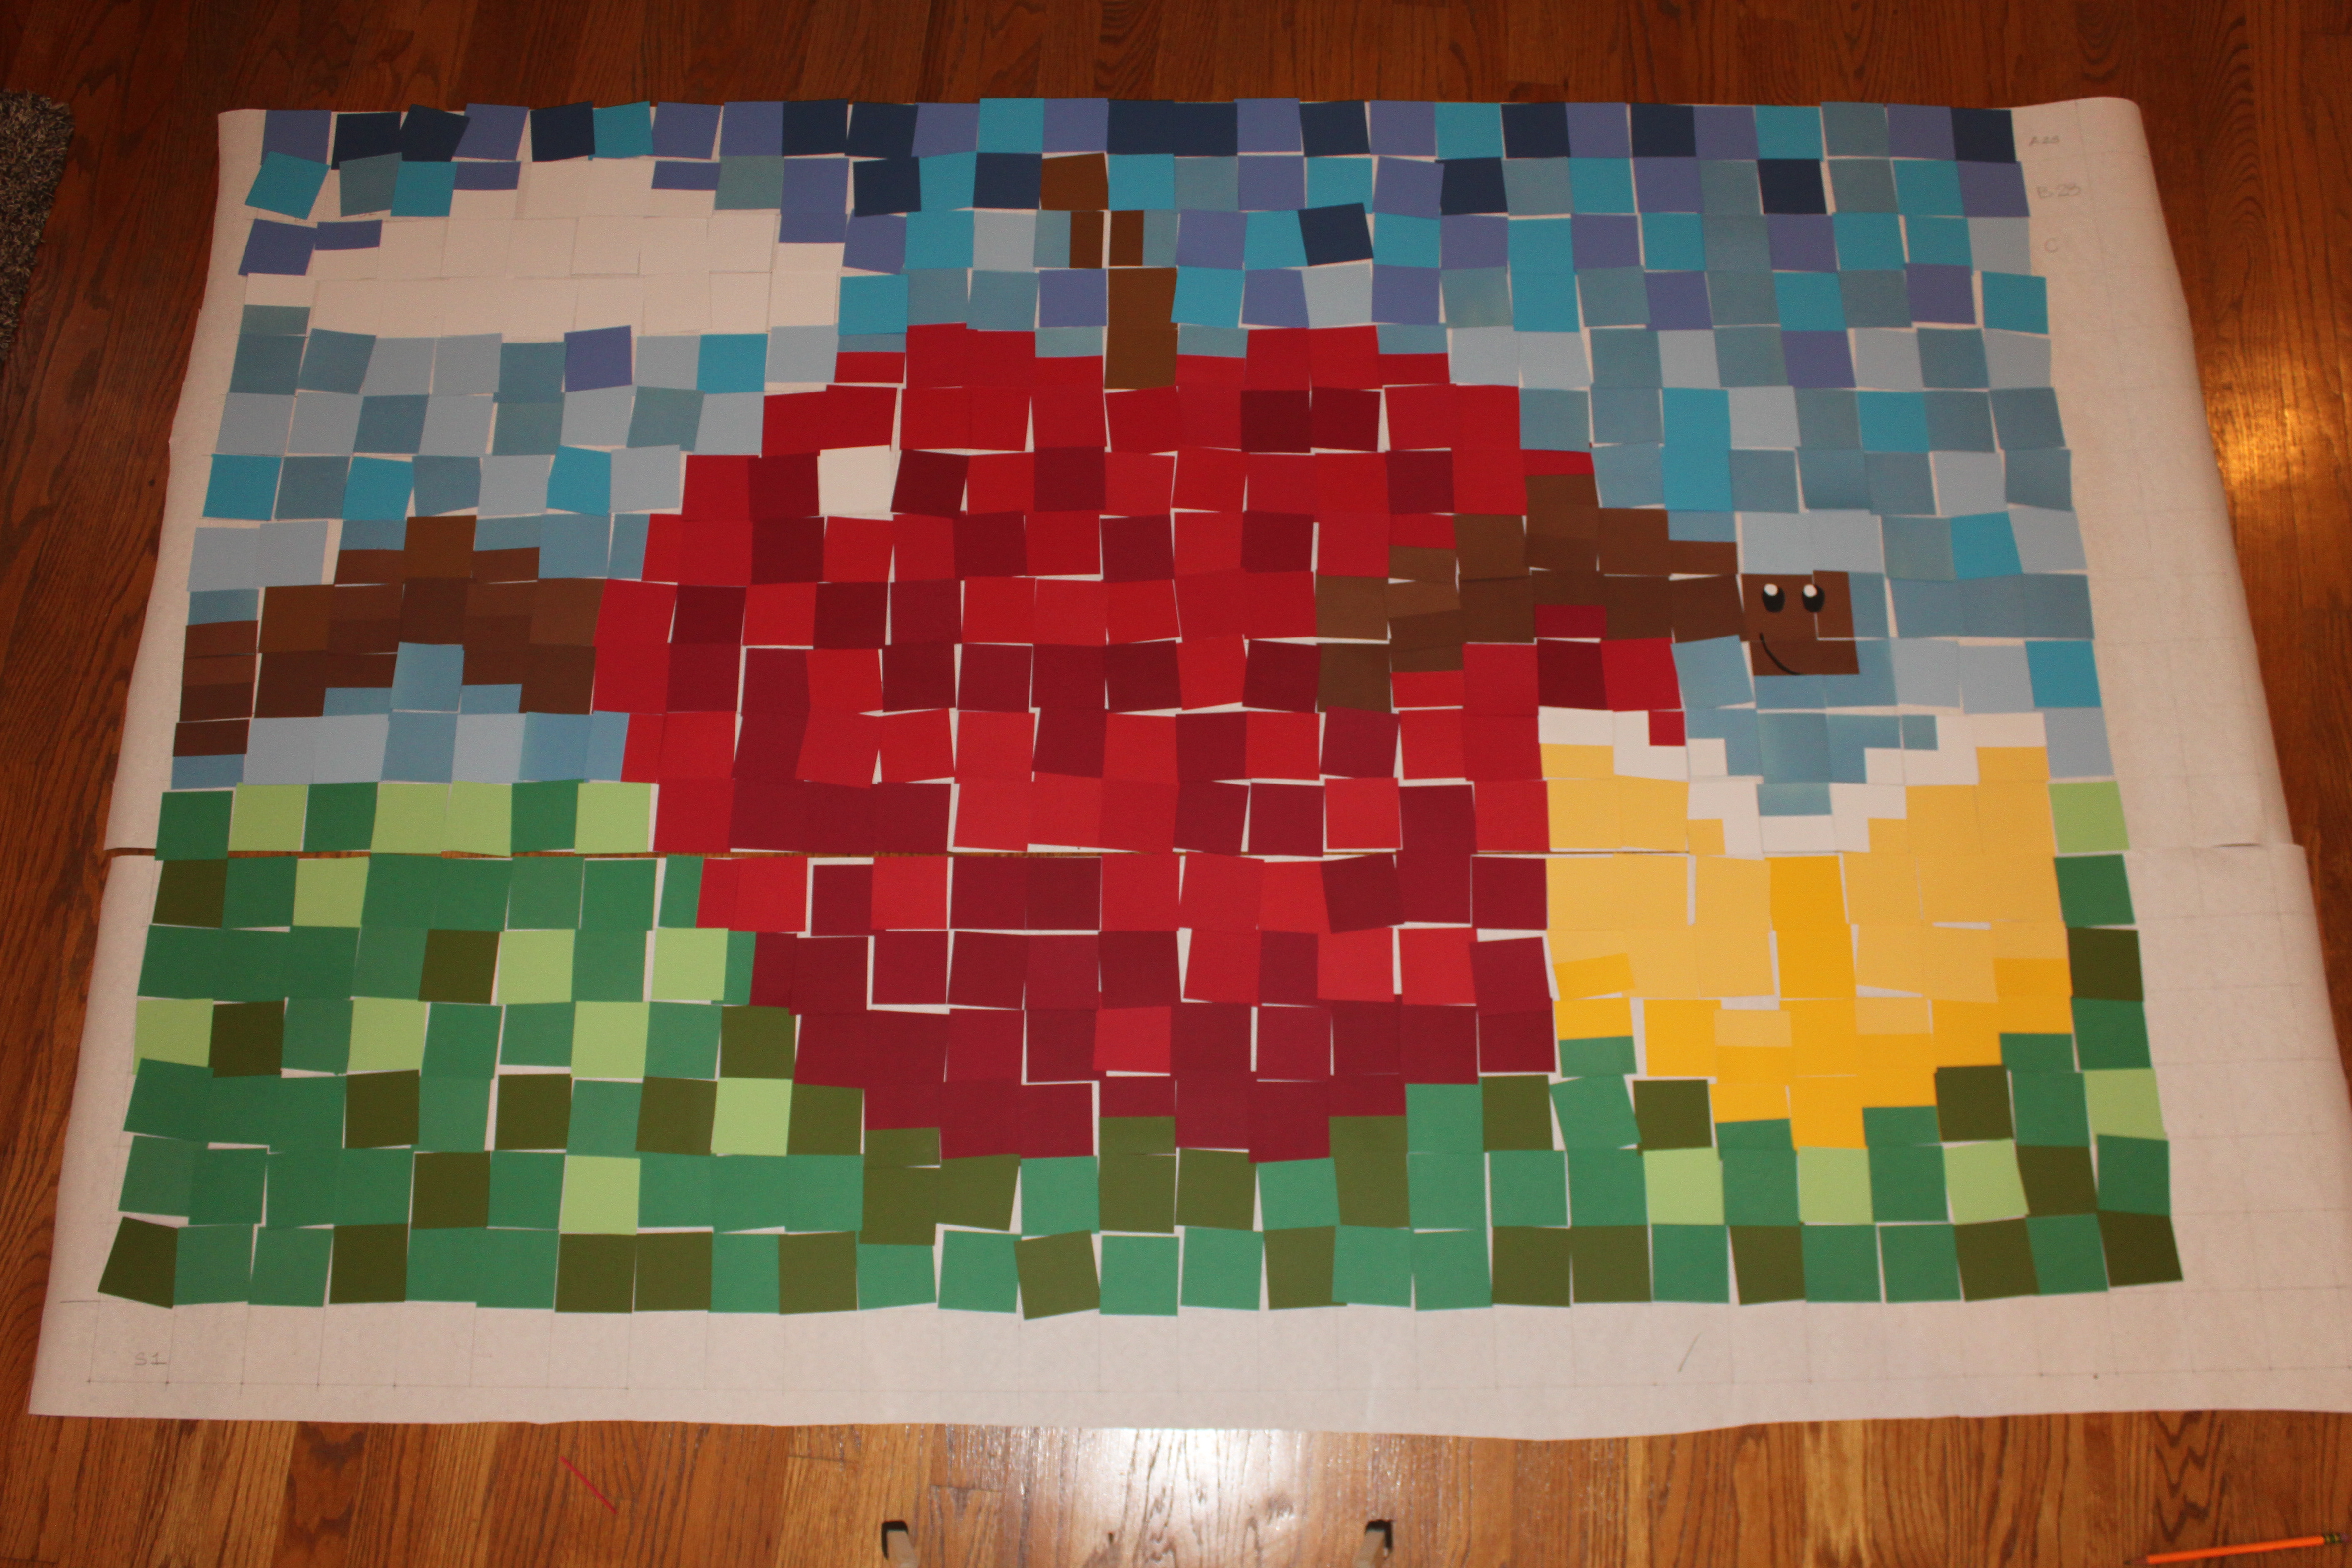 titles written by 480 students on a 4′ x 6′ bulletin board. A large mosaic where each child has a tile seemed like a good way to include each student. Over this past summer I noticed that kids in a wide range of ages were engrossed in creating imaginary worlds using the hit computer game, Minecraft. I thought if the mosaic captured the look of a 2D Minecraft snapshot, the kids would get very excited and involved in the process.
The following is a step-by-step description of how to create the bulletin board shown here. Or, you can use these steps as a guide to create your own unique design.
Materials List:
48″ x 72″ sheet of white bulletin board paper
sheets of card stock in a variety of colors and shades
11″ x 17″ sheet of paper or grid paper for mock-up
X-acto knife
cutting mat
pencils
glue sticks
Step One: Sketch the Idea
Decide on the theme and image for the bulletin board (or use this one as outlined in the following steps.) We chose to illustrate a worm reading a book and boring through an apple because it conveys the themes of “back-to-school” and “summer reading.” Sketch out your design on a piece of paper.
Step Two: The Power of the Grid
Measure the inside dimensions of the bulletin board that you will be using and determine how many students will be participating. Our library bulletin board measures 4′ x 6′ (or 48″ x 72″), and the students in grades 1 thru 8 (483 total) would be the participants. A tile size of a 2 1/2″ seemed a logical size to fit a book title and the reader’s name.
To determine the number of rows in the grid, I divided the height of the board, 48″, by the height of each tile, 2 1/2″:
48″/ 2 1/2″ = 19.2; Rounded down = 19 rows
Next, I determined the number of columns in the grid by dividing the width of the board, 72″, by the width of each tile, 2 1/2″.
72″ / 2 1/2″ = 28.8; Rounded down = 28 columns
The grid will consist of 19 rows and 28 columns.
19 x 28 = 532 total tiles: one for each of the 483 students as well as extra tiles for special conditions and miscounts.
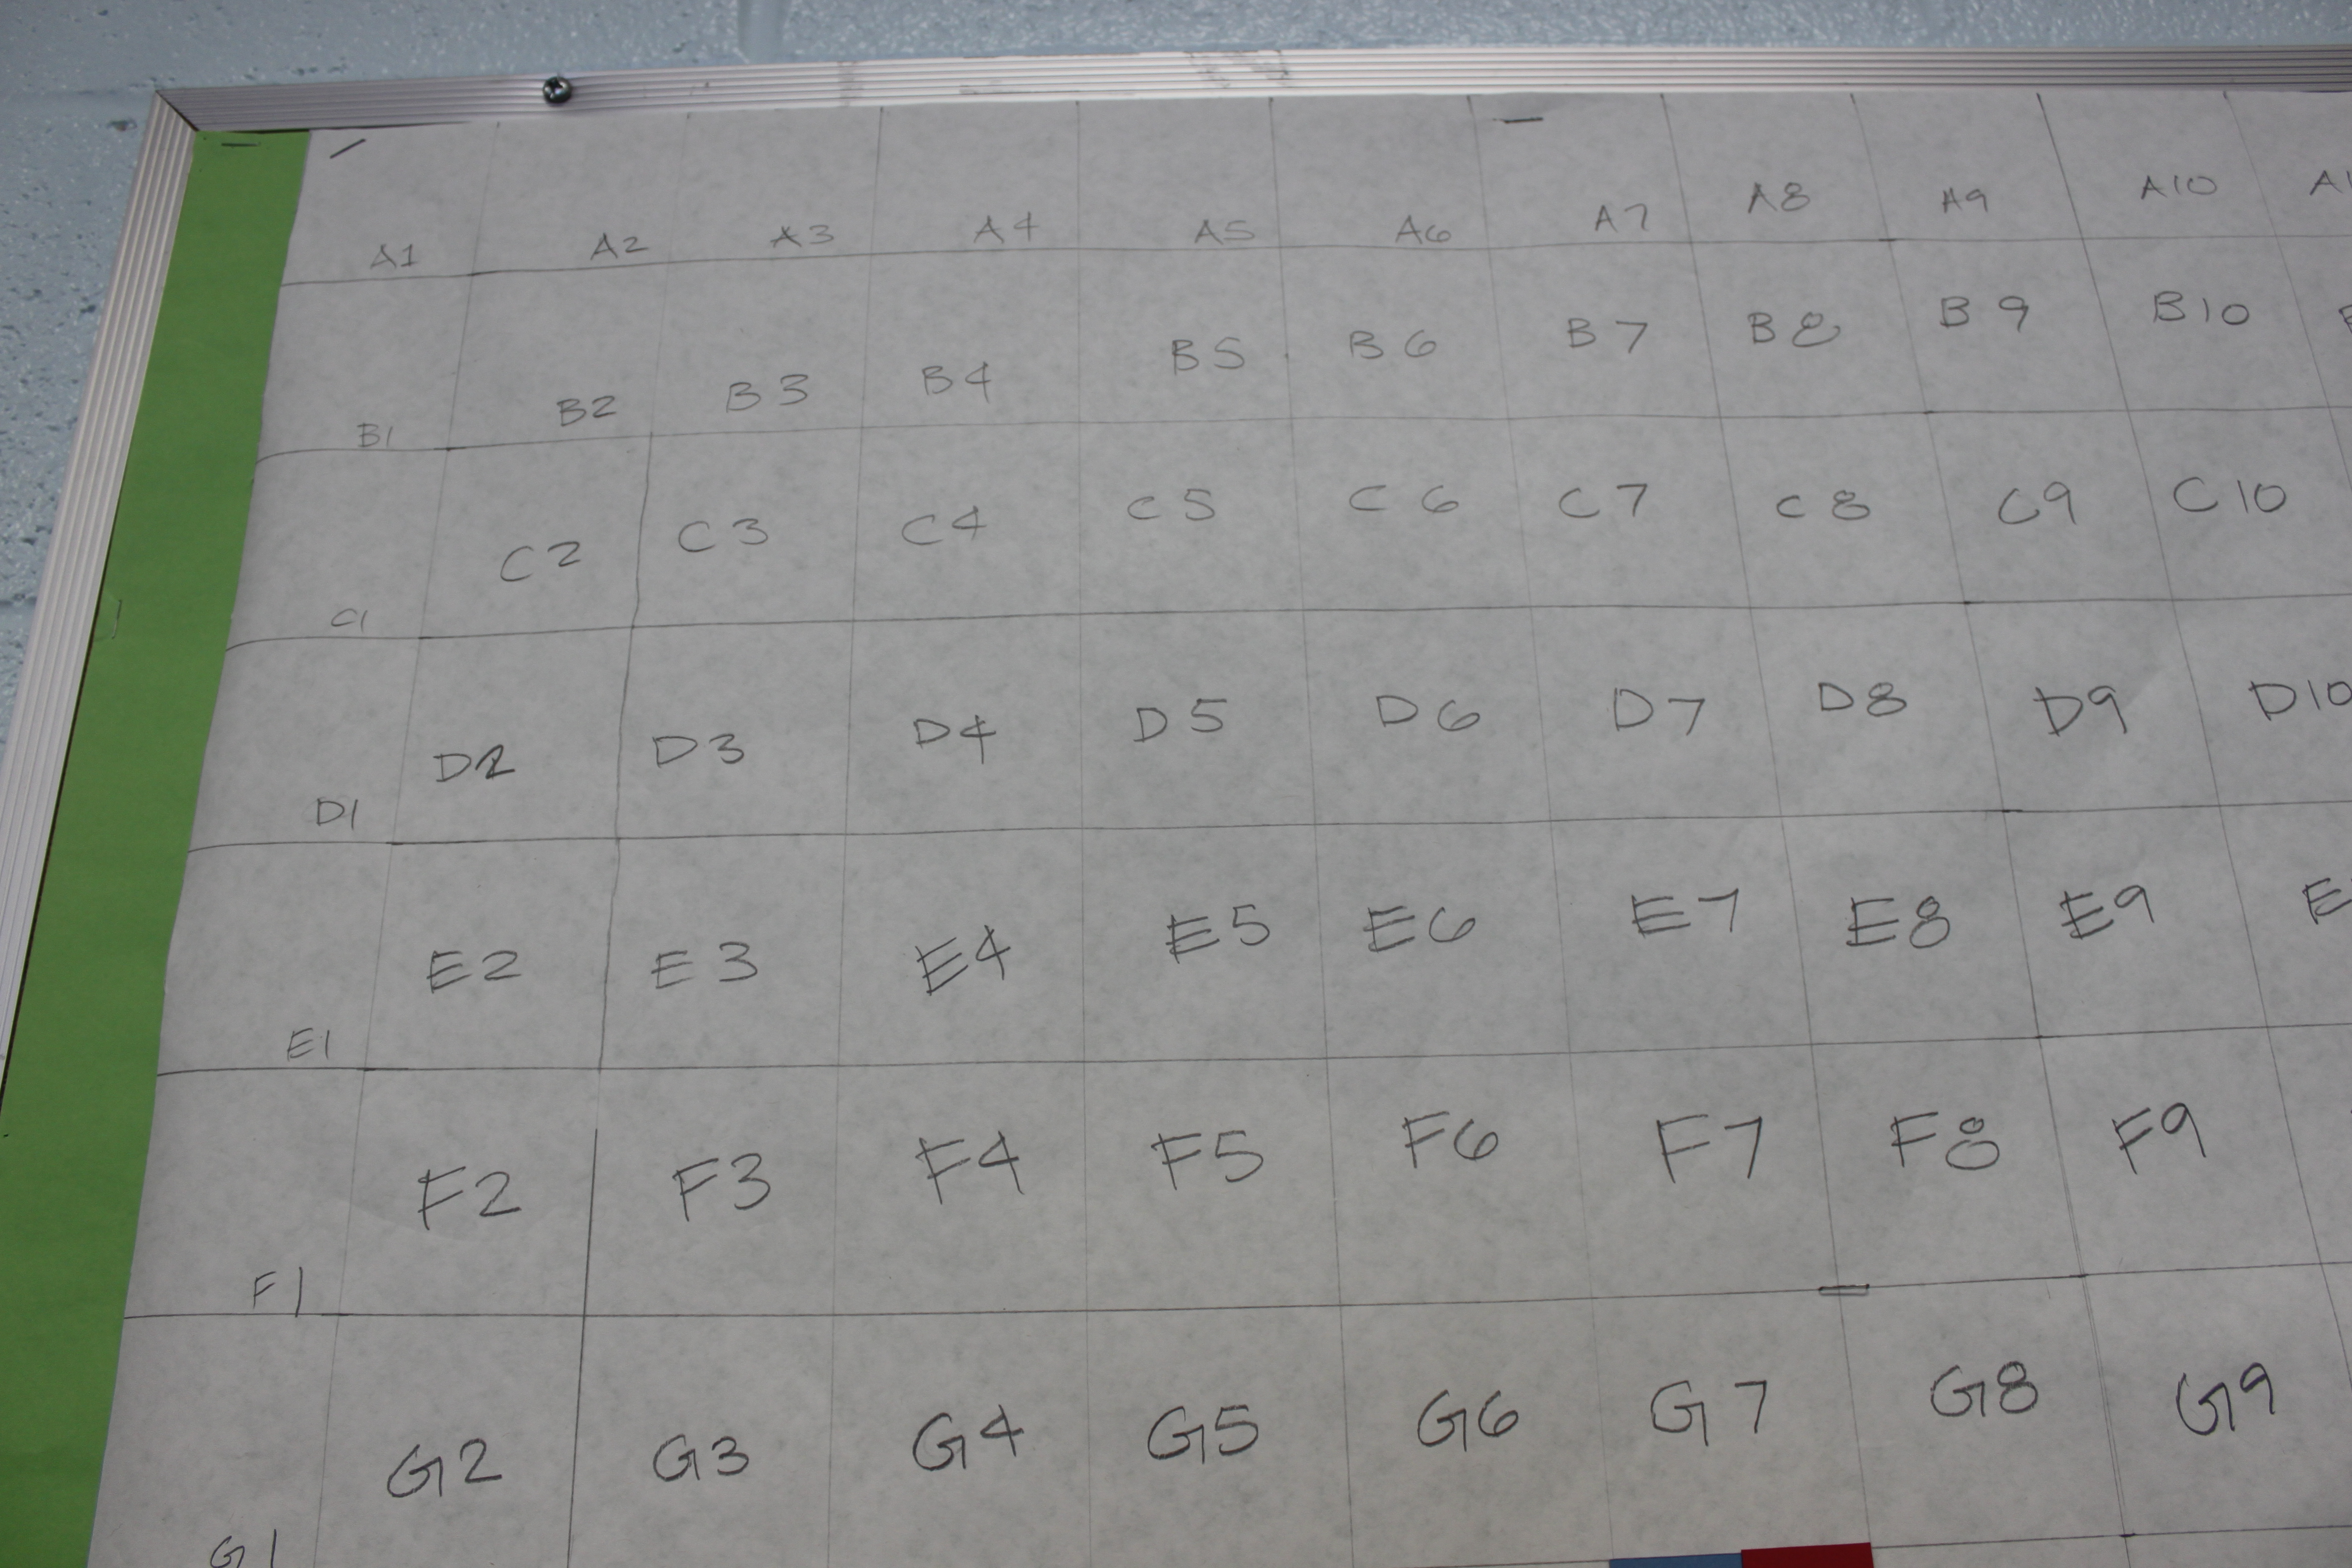 On a sheet of plain white bulletin board paper, create a grid. The grid shown here is made of 2 1/2″ squares consisting of 19 rows and 28 columns. Assign a unique number to each square of the grid. The columns were assigned numbers and the rows were assigned letters so that the top left square of the grid is A1, the next box to the right is A2, and so on. When the grid is complete, staple the sheet of paper to the bulletin board.
Step 3: Create a mock-up
In order to finalize the design, I drew a scaled-down version of the grid. The mock-up grid consists of tiles that measure 1/2″ x 1/2″. The overall dimension of the mock-up is 9 1/2″ x 14″, which is one-fifth the size of the finished product. Assign the same numbering system to the mock-up.
It might be useful to make several copies of the grid to allow for errors. Or you can use trace paper or onion skin (available where drafting supplies are sold) to sketch over the grid.
I transferred the sketch to the grid layout. Using colored pencils, I colored in each square a specific color. In order to keep the apple from looking like a heart, I discovered that some of the squares would need to be divided into 2 colors. I also needed to combine colors on squares to make the snake look more rounded and to show the book leaves opening at an angle.
Once this is done you can determine the color tile needed for each individual square. For example, in this sketch you can see that tile (X#) will be color (X). And tile (X#) will be half red and half blue.
Step 4: Determine the color pallet
The basic colors used in this design are blue for the sky, green for the grass, red for the apple, brown for the worm, tan for the book and white for the cloud, book pages and accents. In keeping with the appearance of Minecraft, and to impart a sense of depth, I  used several shades of each color (except white.) For example, the apple is made up of 3 shades of red, the darker shades are toward the base of the apple to represent shadows. For the sky, the darker shades of blue are toward the top, as in a Minecraft drawing. The scrapbook section of your local craft store is a great place to purchase individual sheets of cardstock in a variety of shades.
The next step is to draw lines of 2 1/2″ x 2 1/2″ squares on the card stock and cut them out. I used an Xacto blade guided by a metal ruler, but a paper cutter or scissors works as well.
Step 5: Number the card stock tiles:
Using the scaled-down mock-up as a guide, write the corresponding cell number on the individual tiles. For example, the mock-up shows that cell number C21 is red. Select a red card stock square (or tile) and write C21 on the back. Cell Cwhatever is half red and half blue. Cut a blue tile in half and glue stick it onto a red tile and write Cwhatever on the back.
Step 6: Assemble the Board with the Students:
The front side of the tile will be the blank side. Each child can write their name and the name of their favorite book (in pencil). The bigger kids can put their tile up on the board themselves – ie card stock tile goes cell C21. I put the square tiles on for grades 1 thru 3 to keep the process simple.
I had the kids use pencil on the lighter colors so that the text would be legible but would not overpower the completed design. However, the students could use pen or marker on the darker colored tiles.
Also, since I had more tiles than students, I put up the tiles that had 2 colors by myself in advance. These tiles have a specific orientation, so it was easier to get them up there in advance
Step 7: Have fun watching the Board come together!
On the first day of each classes’ scheduled library time, the librarian had the kids fill out the colored tiles. So the board would become more filled in as each class came through. When the board was about 1/2 way filled, some of the older kids were able to correctly guess the worm and the apple but the book was still a mystery!